Steps to create:
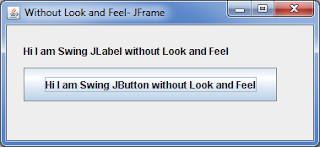
Output of above code:

It is a basic output which you seen above.
If you applying Synth Look and Feel you can change everything.
Firstly we create a XML File, in Which we define properties of any Swing Component Like JLabel,JButton,JTable etc...
Foramt of XML File Like this:
Suppose we have to change the color of Background and Foreground of any component, we have to write the code like this:
Steps:
1. Define a Style with his id.
2. Define a Font with name and size.
3. Then define its States, in code we define this for all states,
States Type:
ENABLED
MOUSE_OVER
PRESSED
DISABLED
FOCUSED
SELECTED
DEFAULT
by default it is in DEFAULT state.
4. In State tag we define two Properties:
BACKGROUND
FOREGROUND
5. Then Bind most important tag, which bind this Style to Particular Component or All the Component.
Here we will know about Bind tag attributes Type and Key.
Type:
Type have two values region and name.
You can bind to individual, named components, whether or not they are also bound as regions.
Key:
Key means its for region like Button,Label,Table Or its for named component like loginBtn,cancelBtn.
Both the properties are very important we have to learn these properties in next chapter.
We have almost completed our look and feel XML file, then we have to apply this look and feel XML.
We will write three simple lines of code for applying this XML look and feel.
Firstly we create SynthLookAndFeel class object and load the XML file.
Then using UIManager Class set the custom look and feel class name.
Complete program:

Hello
- Firstly Create a Java File and making a JFrame with two JLabels like this
package com;

import javax.swing.JButton;
import javax.swing.JFrame;
import javax.swing.JLabel;
import javax.swing.UIManager;
import javax.swing.plaf.synth.SynthLookAndFeel;

/**
 *
 * @author abhijeet-tomar.blogspot.com
 */
public class Test1
{
    JFrame frame;
    JButton button;
    JLabel label1;
    JLabel label2;
    JLabel label3;


    Test1()
    {

        frame = new JFrame("Look and Feel- JFrame");

        frame.setLayout(new org.netbeans.lib.awtextra.AbsoluteLayout());

        frame.setSize(400,400);

        label1 = new JLabel("Hi I am Swing JLabel using Look and Feel");

        button = new JButton("Hi I am Swing JButton using Look and Feel");

        frame.add(label1,new org.netbeans.lib.awtextra.AbsoluteConstraints(20, 10, 380, 40));

        frame.add(button,new org.netbeans.lib.awtextra.AbsoluteConstraints(20, 50, 380, 40));

        frame.pack();

        frame.setVisible(true);

    }

    public static void main(String args[])
    {
        Test1 test_obj = new Test1();
    }

}
Output of above code:

It is a basic output which you seen above.
If you applying Synth Look and Feel you can change everything.
Firstly we create a XML File, in Which we define properties of any Swing Component Like JLabel,JButton,JTable etc...
Foramt of XML File Like this:
------ We have to write code here for swing component --------
Suppose we have to change the color of Background and Foreground of any component, we have to write the code like this:
Steps:
1. Define a Style with his id.
2. Define a Font with name and size.
3. Then define its States, in code we define this for all states,
States Type:
ENABLED
MOUSE_OVER
PRESSED
DISABLED
FOCUSED
SELECTED
DEFAULT
by default it is in DEFAULT state.
4. In State tag we define two Properties:
BACKGROUND
FOREGROUND
5. Then Bind most important tag, which bind this Style to Particular Component or All the Component.
Here we will know about Bind tag attributes Type and Key.
Type:
Type have two values region and name.
You can bind to individual, named components, whether or not they are also bound as regions.
Key:
Key means its for region like Button,Label,Table Or its for named component like loginBtn,cancelBtn.
Both the properties are very important we have to learn these properties in next chapter.
We have almost completed our look and feel XML file, then we have to apply this look and feel XML.
We will write three simple lines of code for applying this XML look and feel.
  try
  {
        SynthLookAndFeel laf = new SynthLookAndFeel();
        laf.load(Test1.class.getResourceAsStream("LookFeelXml.xml"), Test1.class);
        UIManager.setLookAndFeel(laf);
 }
 catch(Exception e)
 {
       System.out.println("Exception in Loading XML File");
 }
Firstly we create SynthLookAndFeel class object and load the XML file.
Then using UIManager Class set the custom look and feel class name.
Complete program:
package com;

import javax.swing.JButton;
import javax.swing.JFrame;
import javax.swing.JLabel;
import javax.swing.UIManager;
import javax.swing.plaf.synth.SynthLookAndFeel;

/**
 *
 * @author abhi
 */
public class Test1
{
    JFrame frame;
    JButton button;
    JLabel label1;
    JLabel label2;
    JLabel label3;


    Test1()
    {

        try{
        SynthLookAndFeel laf = new SynthLookAndFeel();
        laf.load(Test1.class.getResourceAsStream("LookFeelXml.xml"), Test1.class);
        UIManager.setLookAndFeel(laf);
        }
        catch(Exception e)
        {
            System.out.println("Exception in Loading XML File");
        }

        frame = new JFrame("Look and Feel- JFrame");

        frame.setLayout(new org.netbeans.lib.awtextra.AbsoluteLayout());

        frame.setSize(400,400);

        label1 = new JLabel("Hi I am Swing JLabel using Look and Feel");

        button = new JButton("Hi I am Swing JButton using Look and Feel");

        frame.add(label1,new org.netbeans.lib.awtextra.AbsoluteConstraints(20, 10, 380, 40));

        frame.add(button,new org.netbeans.lib.awtextra.AbsoluteConstraints(20, 50, 380, 40));

        frame.pack();

        frame.setVisible(true);

    }

    public static void main(String args[])
    {
        Test1 test_obj = new Test1();
    }

}
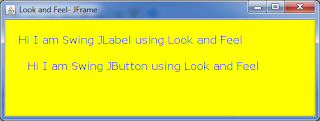
Output of above code:
Hello